Blogging with org-mode, Jekyll and Gitlab Pages
I invested a little of my time to setup this blog so, in this post, I'm going to tell you my experiences so far.
Dafuq's org-mode?
Org-mode was originally created to take notes and organizing assignments with Emacs. Today, however, it's used to get things done, clock tasks, manage pomodoros and Jira issues and (why not?!) write blog posts with it.
All of these features are written using org syntax, which can be considered a markup language. For blogging purposes, org-mode gives us a pandoc-like experience and can export its files to the most used formats, like html, PDF and even Markdown, inside Emacs.
Exporting the blog
To publish a blog, we have to convert the org-mode files to html files of all of our posts.
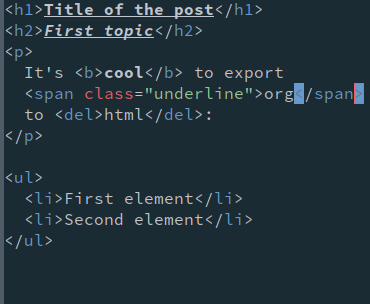
In short, we gotta go from this:

To this:
The builtin way to do that is to simply assign a variable called org-publish-project-alist with an alist containing the following information:
(setq org-publish-project-alist
  `(("org-files"
     ;; ommited other configurations for brevity
     :base-directory "~/blog/org/"
     :base-extension "org"
     :recursive t
     :publishing-directory "~/blog/_posts/"
     :publishing-function org-html-publish-to-html)
    ("static-files"
     :base-directory "~/blog/org/"
     :base-extension "png\\|jpg"
     :publishing-directory "~/blog/res/"
     :recursive t
     :publishing-function org-publish-attachment)
    ("blog" :components ("org-files" "static-files"))))
After this variable is loaded, we can call the command M-x org-publish, then the prompt will let you choose among three values: blog, org-files and static-files.
When we select the org-files value, for example, org-mode will search recursively for files with the .org extension (base-extension) in ~/blog/org folder (base-directory),
perform the conversion of org to html with the function org-html-publish-to-html (publishing-function) and,
lastly, copy the resulting file in ~/blog/_posts (publishing-directory).
The same idea applies to static-files, but, in this case, it'll copy the .png and .jpg files without any modification to ~/blog/res.
The blog option will perform these two actions automatically.
A cool feature is that the publishing-function will determine how org-mode will export your content.
If, instead of org-html-publish-to-html, we had specified org-beamer-publish-to-pdf, our org files would be converted to a beamer presentation.
Syntax highlighting
This is a programming blog, so the way that code snippets are presented here is really important. There are tons of methods of displaying code in a blog: with Javascript, Ruby or Github gist.
But, with org-mode, there's a better way to highlight this code. With the htmlize package and org-mode itself, it's possible to take a "snapshot" of the Emacs appearance and translate it to the browser.
Basically, htmlize converts all existing Emacs faces into CSS properties. Emacs faces are graphical attributes responsible for the presentation of a text, i.e, they are the how text is presented to the user in Emacs.
To make it clearer, I'll try to give a small example of how this process works. Based on the movie The Shining and the iconic scene which Jack Nicholson loses his mind and breaks down a door with an axe, every time the word "Axe" appears, it will be highlighted in white and red. This is a silly example, but the idea is to show a small and practical example of how the conversion between faces to CSS happens. A particular context was chosen, but that's exactly the same concept used to highlight brackets, parentheses, keywords and comments.
1. Face declaration and highlight logic
First of all, the face shinning-face is defined and highlighted appropriately whenever the word Axe appears in a programming related mode.
;; Defining the face
(defface shinning-face
  '((t (:background "white" :foreground "red")))
  "Face to highlight the Axe word")

;; Everytime the word Axe appears,
;; Emacs applies the shinning-face to display it
(add-hook 'prog-mode-hook
          (lambda ()
            (font-lock-add-keywords nil
                                    '(("\\<\\(Axe\\)\\>" 1
                                       'shinning-face t)))))
2. Converting the face appearance in CSS
After that, the command org-html-htmlize-generate-css will generate a buffer
with all existing faces, including the shinning-face one, as CSS properties.
/* Rest of the faces. Omitted for brevity */
.org-shinning {
  /* shinning-face */
  color: #ff0000;
  background-color: #ffffff;
}
/* Rest of the faces. Omitted for brevity */
3. Exporting the code block
Finally, when exporting the org-mode code block (#+BEGIN_SRC), it will convert all used faces to the corresponding CSS class.
In this case, the "Axe" word will be around a span with the org-shinning class.
# Ruby
class Axe
  def self.chop_down_door
    puts "Here's Johnny!"
  end
end
# Python
class Axe:
    def say():
        print("Here's Johnny")
By the way, these colors are from the doom-one theme, but you're free to use any available theme.
Hosting with Gitlab Pages
You can host your blog here with any static website generator that you want as long as it is
blackJekyll – Github Pages
After the html files are ready with your juicy content, you need a place to host it. A popular option is to host it in Github Pages; however, a major drawback is that you can only use Jekyll and, to make it worse, they limit you with only a collection of plugins.
This is where Gitlab Pages really shines. Because of its unique way to tie the blog generation with their continuous integration process (Gitlab CI), you have the flexibility and freedom to choose any library or framework that you desire to host your blog. It's possible to build your site with Hugo, hexo, middleman or insert your prefered static site generator.
Fundamentally, Gitlab CI uses the file .gitlab-ci.yml to configure the tasks of the project. With it, you choose the docker images in which your job will run, install the packages required for the blog generation and invoke the necessary commands to generate your static site. As an example, the .gitlab-ci.yml of this blog is similar to this:
1. Stages
1: stages:
2:   - build-org
3:   - filter-css-classes
4:   - publish
The first step is to identify all the required tasks and split them into stages. We'll need to:
- build-org: Export all the posts written in org files to html
- filter-css-classes: Extract the only used css classes from the exported theme. I'll explain later what it means
- publish: Gather together all the blog pieces with Jekyll
With this configuration, we'll be able to maintain an order and have a better control over our jobs.
Basically, all the jobs declared with build-org will run first then filter-css-classes jobs and then the publish jobs.
It's not our case, but a nice feature is that, if more than one job is in the same stage, they'll run in parallel.
2. Export org to html
 5: org-generation:
 6:   image: iquiw/alpine-emacs
 7:   script:
 8:     - emacs -batch -q -l export.el -f org-publish-all
 9:   artifacts:
10:     paths:
11:       - _posts
12:   stage: build-org
The top-level elements are the job name (org-generation) and the docker image that this job will be executed.
After the image is downloaded, the script emacs -batch -q -l export.el -f org-publish-all will be executed in a fresh container based on that image.
Let's break down this command:
-batchis used to run Emacs in a noninteractive mode. When the specified function ends, it automatically exits.-qdoes not use the default$HOME/init.elfile-lis used to use the export.el as a bootstrap; in this file we install org-mode and htmlize and set the publishing variable-fis specified to call the function that will export all of those
Since each stage is executed in a clean container for every build, we need to use artifacts to pass the result of this stage to the next ones. So, the folder containing the exported posts will available to all the future jobs in other stages.
Lastly, we specify that this job will be in the build-org stage group, which means that this will be the first job to run.
3. Filter CSS classes
13: css-theme:
14:   image: node:6.11.3-alpine
15:   script:
16:     - node syntax-extractor/index.js base16-default-oceanic _assets/css/syntax.scss
17:   artifacts:
18:     paths:
19:       - _assets/css/syntax.scss
20:   stage: filter-css-classes
Before, we said that htmlize exports all the faces of Emacs into CSS classes. This may cause a problem because Emacs has a lot of faces and htmlize will consequently generate a huge CSS file. In my current Emacs setup, the exported theme has more than 800 classes and weights more than 50KB. Ouch!
To avoid wasting unnecessary bandwidth of the visitors, I made a script in node using cheerio that filters the classes of all posts to only use the necessary ones. After this, only CSS classes that corresponds to the aspect of the code, like function declaration and variable declaration, are exported.
4. Jekyll FTW
21: pages:
22:   image: ruby:2.4-alpine3.6
23:   script:
24:     - JEKYLL_ENV=production jekyll build -d public
25:   artifacts:
26:     paths:
27:       - public
28:   stage: publish
29:   only:
30:     - master
Finally, we simply use Jekyll to take care of the blog boilerplate, like sorting the posts by the date and generating a RSS feed.
Because of the only option, this job will run only if there is new code coming from the master branch.
In addition, the only Gitlab Pages requirement is that the public folder containing the static pages should be exported as an artifact.
Checking the results
What I like about this approach is that we have a clean state every time
and any problems with previous build hardly interferes with new ones.
Also, because we're using the Alpine distribution for every jobs and making use of the cache (not shown here),
it takes only a couple of minutes to do a git push and see the modification in the site.
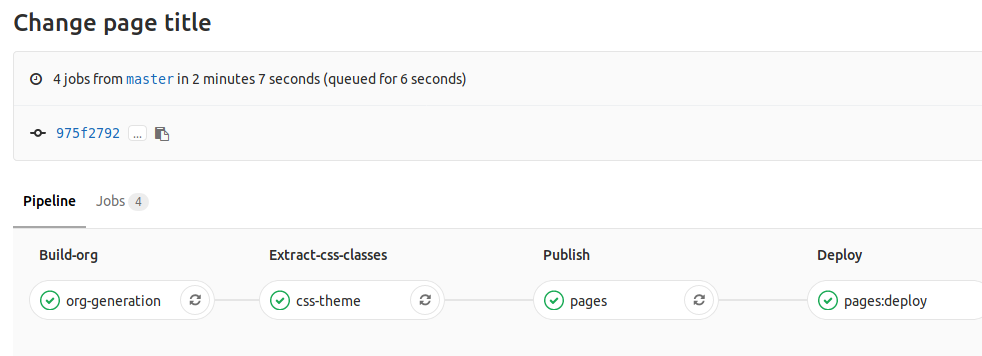
Notice that he last stage (pages:deploy) is performed internally by Gitlab and it's the step that indeed turns that public folder into a web page available in the Internet.
Just like with Github Pages, in the end, you'll have your website hosted in username.gitlab.io automatically.
HTTPs and other niceties
Beyond the freedom that Gitlab CI gives to you, Gitlab Pages also supports HTTPs for custom domains. With Let's Encrypt you can semi-automate the process of certificate renewal manually or with Jekyll. In the future, maybe we won't need to do this since there's an open issue to automate this part of the process.
If this process is too manual and if you trust Cloudflare owning your keys, a fire and forget option is to let Cloudflare manage your certificates. However, if you choose this path, remember to always choose the full strict mode. Not to mention that it's always nice to use a CDN to improve the performance and reliability of a website.
And, for SEO reasons, we can redirect naked domains to www or vice-versa and to force the use of HTTPS with Cloudflare Page Rules feature. Don't worry about the price because these options are all available in the free tier.

Conclusion
In this article, I tried to talk a little about this blog setup and the process of creating it. Without spending a dime, you can have a professional website with any static site generator and use the awesome functionalities of org-mode and Emacs.
Also, you are not tied to use Gitlab Pages only for blogging. Any static site, like a resume exported to LaTeX or a presentation exported to PDF, can use the same principles presented here.
If you wanna try it out, fork the project that hosts this lame blog.